If you are having trouble joining online games on your Xbox 360, or if you can’t hear other players in games you’ve joined, you may have a Network Address Translation problem.
The NAT on an Xbox 360 is set to open, moderate, or strict. The latter two NATs limit the connections that your Xbox 360 can make with other consoles on the network: Moderate NATs can connect only with consoles using moderate and open NATs, and strict NATs can connect only with consoles using open NATs. The bottom line is that you want an open NAT setting in order to connect with other players smoothly.
Is It a NAT Problem?
First, find out if your connection problem is a NAT issue.
1. On your Xbox 360, open My Xbox.
2. Choose System Settings.
3. Choose Network Settings.
4. Choose Wired Network or your wireless network name.
5. Choose Test Xbox LIVE Connection.
If you have a NAT problem, you’ll see a yellow exclamation point and text reading ‘Your NAT type is set to [Strict or Moderate].’
Opening the NAT Settings
First, you need to gather some information about your network:
1. On a PC connected to your network, click Start, and then type cmd into the search field. Press Enter.
2. In the window that pops up, type ipconfig and press Enter.
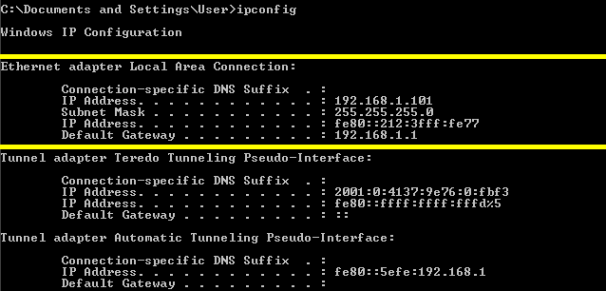
3. Look under the heading for your network connection–which you’ll likely find listed as Local Area Connection or Wireless Network Connection–and record the numbers given for the following items:
- IPv4 Address (or IP Address)
- Subnet Mask
- Default Gateway
Second, you need to turn on Universal Plug and Play for your router.
1. On a PC connected to your network, open a Web browser.
2. Type the Default Gateway number (that you recorded earlier) into the address bar, and press Enter.
3. Type in the username and password for your router. Username and password defaults vary based on the router model. If you are unsure of your default username and password, refer to your router’s documentation or find them using the guide on the Port Forward website. If someone changed the default login information and you don’t know it, you’ll need to reset your router.
4. Make sure that UPnP is turned on. Refer to your router’s documentation if you can’t find the UPnP setting.
5. Restart your Xbox 360, and run the connection test again.
If your router doesn’t have UPnP, or if turning UPnP on doesn’t open your NAT, you need to assign a static IP address to your Xbox 360 and set up port forwarding.
1. In the Network Settings menu on your Xbox 360, select the Basic Settings tab.
2. Choose Manual.
3. Select IP Address.
4. Take the Default Gateway number that you recorded earlier, and add 10 to the last number. For example, if your Default Gateway is 192.168.1.1, the new number is 192.168.1.11. This new number is your static IP address; enter it as the IP address, and then choose Done.
5. Select Subnet Mask, enter the Subnet Mask number that you recorded earlier, and then choose Done.
6. Choose Gateway, enter the Default Gateway number that you recorded earlier, and then choose Done.
7. Select Done again.
8. On a PC connected to your network, open a Web browser and log in to your router’s interface.
9. Open the following ports:
- Port 88 (UDP)
- Port 3074 (UDP and TCP)
- Port 53 (UDP and TCP)
- Port 80 (TCP)
If you aren’t sure how to open ports on your router, refer to your router’s documentation or to the guide on the Port Forward website.
Still No Luck?
If you’ve performed all of the steps above, and the connection test still reports a moderate or strict NAT setting, turn off your Xbox 360 and your router, wait 60 seconds, and then turn on your router. Wait 60 more seconds, and then turn on your Xbox 360 and test again.
You can also try entering the static IP address you created earlier into the DMZ field in your router’s settings. Log in to your router’s interface, search for DMZ Host, type in the static IP, and then apply the changes.