
Photoshop CC New features in Depth, the BIG little things
In our ongoing coverage of the new Features in Photoshop CC 2019 in depth, I have a new tutorial for you. We are taking a closer look at the unsung heroes. These are some of the features that are hiding in plain sight. I say that because they are easily overlooked if you aren’t aware of them. For example, click on the canvas to apply a transformation instead of the tool bar, or click on type with the move tool and it switches to the type tool. If you are unaware and working with muscle memory, you would never even be aware that easier ways of working exist. The goal of this tutorial is to make you aware of these and other new features, designed to improve your workflow. I suggest watching the video first and then reading the text below.
Photoshop CC is packed with lots of new features. This is part of a series where we look at the new features and dive in a little deeper. The other installments are here..
Photoshop CC 2019 New Feature tutorials
New Workflow improvements and tricks in Photoshop CC 2019
All of this is covered in depth in the video, but I’ll add some useful footnotes here.
#1 Proportional scaling
For eons, someone thought it was a good idea for us to hold down the Shift key when scaling things proportionally. This is so drummed into our muscle memory that we don’t even thing about it. Now, we don’t need to hold down Shift anymore, everything stays in proportion as we drag the sizing handles, the same as any other software on the planet. It’s going to take a little to get used to having a free-hand now, maybe sip coffee with it. To scale anything, choose Cmd/Ctrl+T for Free Transform. Or when placing an object these handles come up by default. If you want to scale it freestyle (unconstrained) Hold down Shift. (Its flipped)

But, where is the anchor point? You know, that little cross hair thing that you always drag by accident while scaling small things. This anchor point is useful because we can use it to scale or rotate from a non center position. Think, rotating from a corner, for example. It’s still there, but hidden by default. You can toggle it on from the Options bar. You can even click on a point to set it to the center or an edge or corner. You can as always drag the anchor point freely too.


#2 On Screen application of transform
Another big one to miss is to apply a transformation. Usually when we transform something, work on text or crop, we click the checkmark up in the options bar, press enter (but not for text) or just click another tool to accept the changes. Now all we need to do is click on the canvas to apply the changes. I’m still trying to get used to this because it’s so easy, it’s easy to miss.

#3 Text tool
You are using the move tool and you decide to change some text. You know the story, you grab the type tool and double click the text to edit it. You no longer have to do that, double clicking the text with the move tool will allow you to edit the text, it changes to the type tool automatically. When you click away, your cursor changes back to the move tool. (I have a couple of other text tricks in included in the video above, it’s easier to see it in the video rather than trying to explain it here.
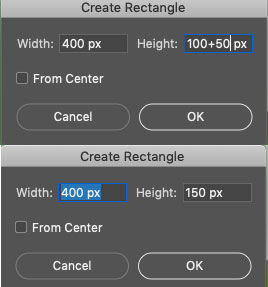
#4 Math in Boxes
You can perform math inside dialog boxes so you don’t have to think so hard
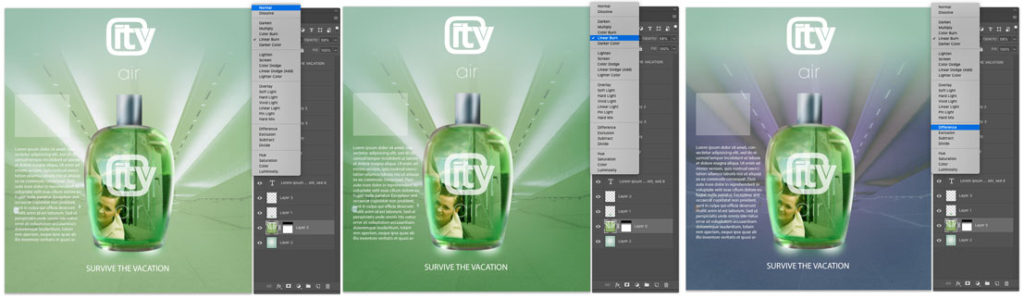
#5 Preview of Blending Modes
This one is a really useful one. As you hover over the different Layer Blending Modes, you will see an onscreen preview of that blending mode.
(If you want to learn more about Blending Modes, check out the PhotoshopCAFE Ultimate Guide to Blending Modes)
However, a (very) few people have complained about the Blending Modes not displaying correctly on Screen. Here is the fix for that and also any other display bugs you may be experiencing in Photoshop CC 2019.
How to fix bugs in Photoshop CC 2019
Choose preferences>Performance and Turn on Legacy Compositing if you are experiencing problems.

Every software release has a few bugs and PS CC2019 is no exception. (Some people have blown this out of proportion, CC 2019 is very stable). The other reported bug (I asked people to list them) is that the bracket keys [ and ] don’t change the brush size inside the Select and Mask workspace. You can fix this by resetting Photoshop Preferences
Resetting Photoshop Preferences: Hold Down Shift+Alt/Option+Cmd/Ctrl while launching Photoshop.
Thanks for checking this out and welcome to the CAFE!
Don’t forget to join our mailing list for weekly tutorials and drop a comment, let me know your favorite new feature.
Colin
PS Don’t forget to follow us on Social Media for more tips.. (I’ve been posting some fun Instagram and Facebook Stories lately)
You can get my free Layer Blending modes ebook along with dozens of exclusive Photoshop Goodies here 


