Step 1
I started with a new document at 800 X 800 pixels, RGB and 72 dpi. The size doesn’t matter really.

Set your foreground and background colors to light and dark wood tones as shown.
Step 2
Choose Filter>Render>Fibers.
This is where you will dial in the wood texture. Experiment with different variance and strength settings for different results.
Step 3
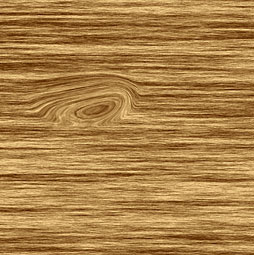
You will now have a texture that looks like wood. If you don’t like it, undo and try the fibers again with different settings.
I like to stretch the texture a little bit.
Choose Image>Image size and make the height 2x the width (800×1600)

Step 4
Many times you may prefer the texture to be horizontal. In this case choose Image>rotation> 90 Clockwise

Step 5
For a touch or realism, let’s add some knots (optional)
Choose the elliptical marquee tool and make oval shaped selections. In this case I made 2 selections. Tip: Hold down the shift key to add a second selection.

Step 6
Before we add the knots, let’s make sure they blend in. Choose Select>Modify Selection>Feather and choose 30 pixels
Choose distort>Twirl to create the effect. I chose and angle of 205. This setting will all depend on the resolution of your image and how tight you want the knot to appear.

Step 7
One last thing to give it that final polish, and this is optional.
Choose Filter>Sharpen>Unsharp Mask to define the wood a little but more.
Amt:91
Radius: 2.2

There you have it, wood texture in Photoshop.

Feel free to comment and let us know what tutorials you would like to see in the future.
PS Don’t forget to follow us on Social Media for more tips.. (I’ve been posting some fun Instagram and Facebook Stories lately)
You can get my free Layer Blending modes ebook along with dozens of exclusive Photoshop Goodies here