

Reframe and resize bulk images in Photoshop – resizing for Instagram etc
This Photoshop tutorial shows you how to work with multiple photographs, the easy way. Use Photoshop scripts to automate putting images into a layer stack. Then non-destructively crop and then make individual images from each layer.
Have you been doing it the the hard way?
Step 01. Loading the images into Photoshop
Don’t load them in 1 at a time please. Choose File>Scripts>Load Files into stack.
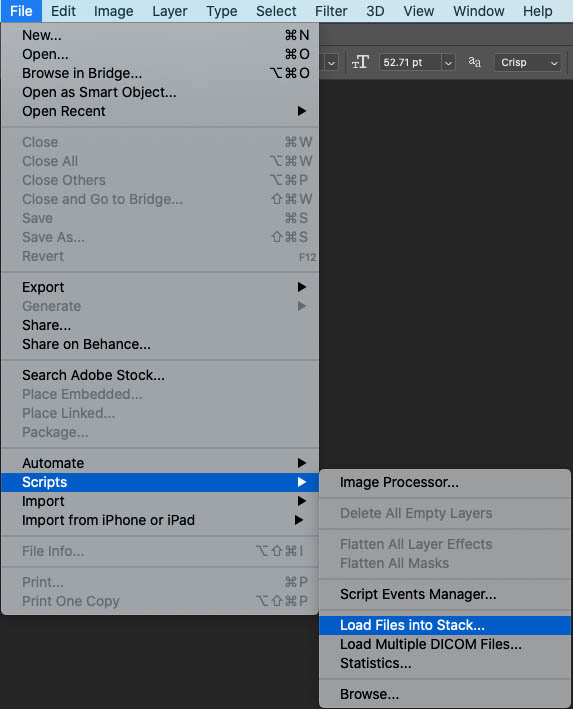
Step 02.
Click on Browse. (If they are already open in Photoshop, choose Add Open Files).

Step 03
Browse to the folder of images and select the images you want to import. I click dragged around them all. Ctrl/Cmd+A will also select all.
Click ok

Step 04
You will see the files about to be added
Click OK

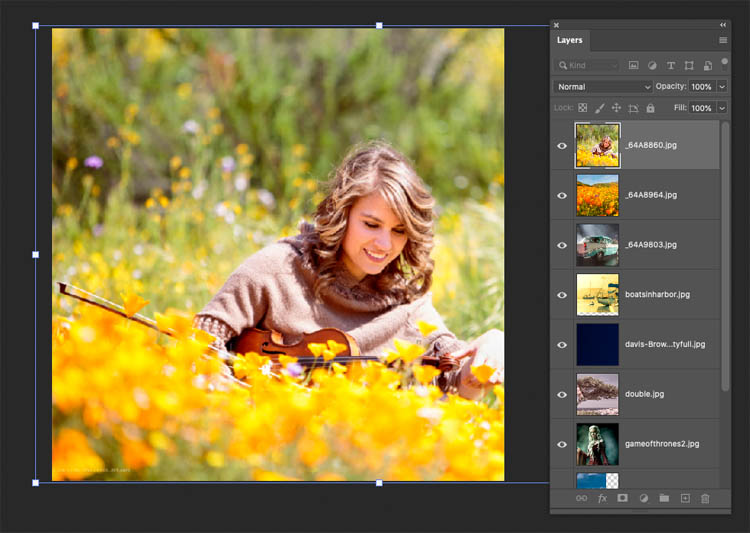
Step 05
You will now see all the images loaded into layers. The document size will be the size of the largest images. They aren’t resized from their original sizes. (If you want them the same size, you can use File>Scripts>image processor)

Step 06. Resizing all the images
Choose the crop tool.
In this case we will resize for Instagram at 1080 x 1080 square.
Choose W+H+Resolution
Type in 1080px (px will make them pixels) and 72 for px/in
IMPORTANT! Turn off Delete Cropped Pixels, so it just makes a window around the layers and doesn’t actually crop them permanently.
![]()
![]()
Step 07
Drag the corner of the crop window until it fits one of the smaller images.
Click the checkmark / press Enter to apply the crop

Step 08
Choose the top layer
Press Cmd/Ctrl+T for free transform.
Scale and position the layer to fit within the crop window. Press Enter to apply. Notice that you can position the layer and it isn’t cut off because you are using non-destructive cropping. (Because you turned off Delete Cropped Pixels)
Step 09
Hide the top layer.
Choose the next layer and repeat step 8 to scale and position.
Go through each layer, positioning and scaling the layers until each one looks good.

Step 10. Turning each Layer into its own image.
Don’t export each layer separately.
Choose File Export>Layers to Files

Step 11
Click Browse next to destination to choose the folder to save the images in.
You can also add a name if you like, this will be appended before the original file name.
Choose jpg and 7 quality for web/social media.
Click Run

Step 12
All the layers will be saved as individual images.

Step 13 – Batch rename in Bridge.
If you want to rename multiple photos at once, bridge is the fastest way.
Click the arrow next to the document looking icon at the top of bridge and choose Batch Rename.

Step 14
You can add or remove fields by clicking the – or + signs at the right of the fields.
Under New Filename Use Text and enter your desired name.
If you want to add incremental numbers, choose Sequence Number. Type the number you want to begin with. 1 in this case and choose the number of digits. (This will effect leading zeros).
Click Rename.

Step 15
All done

I hope this little tutorial saves you lots of time.
If it does, please take a few of those valuable seconds I just saved you to share this with a friend or 2 on Social Media or email.
Great to see you here at the CAFE
Colin
PS Don’t forget to join our mailing list and follow me on Social Media>
(Ive been posting some fun Instagram and Facebook Stories lately)
You can get my free Layer Blending modes ebook here
If you like these techniques and you would like to dive deeper into Photoshop, I have just launched an in-depth Photoshop Course. Its called Photoshop Secrets: Photoshop 2020 for Digital Photographers, Check it out here
PS Don’t forget to follow us on Social Media for more tips.. (I’ve been posting some fun Instagram and Facebook Stories lately)
You can get my free Layer Blending modes ebook along with dozens of exclusive Photoshop Goodies here 


