► Download the practice images here:
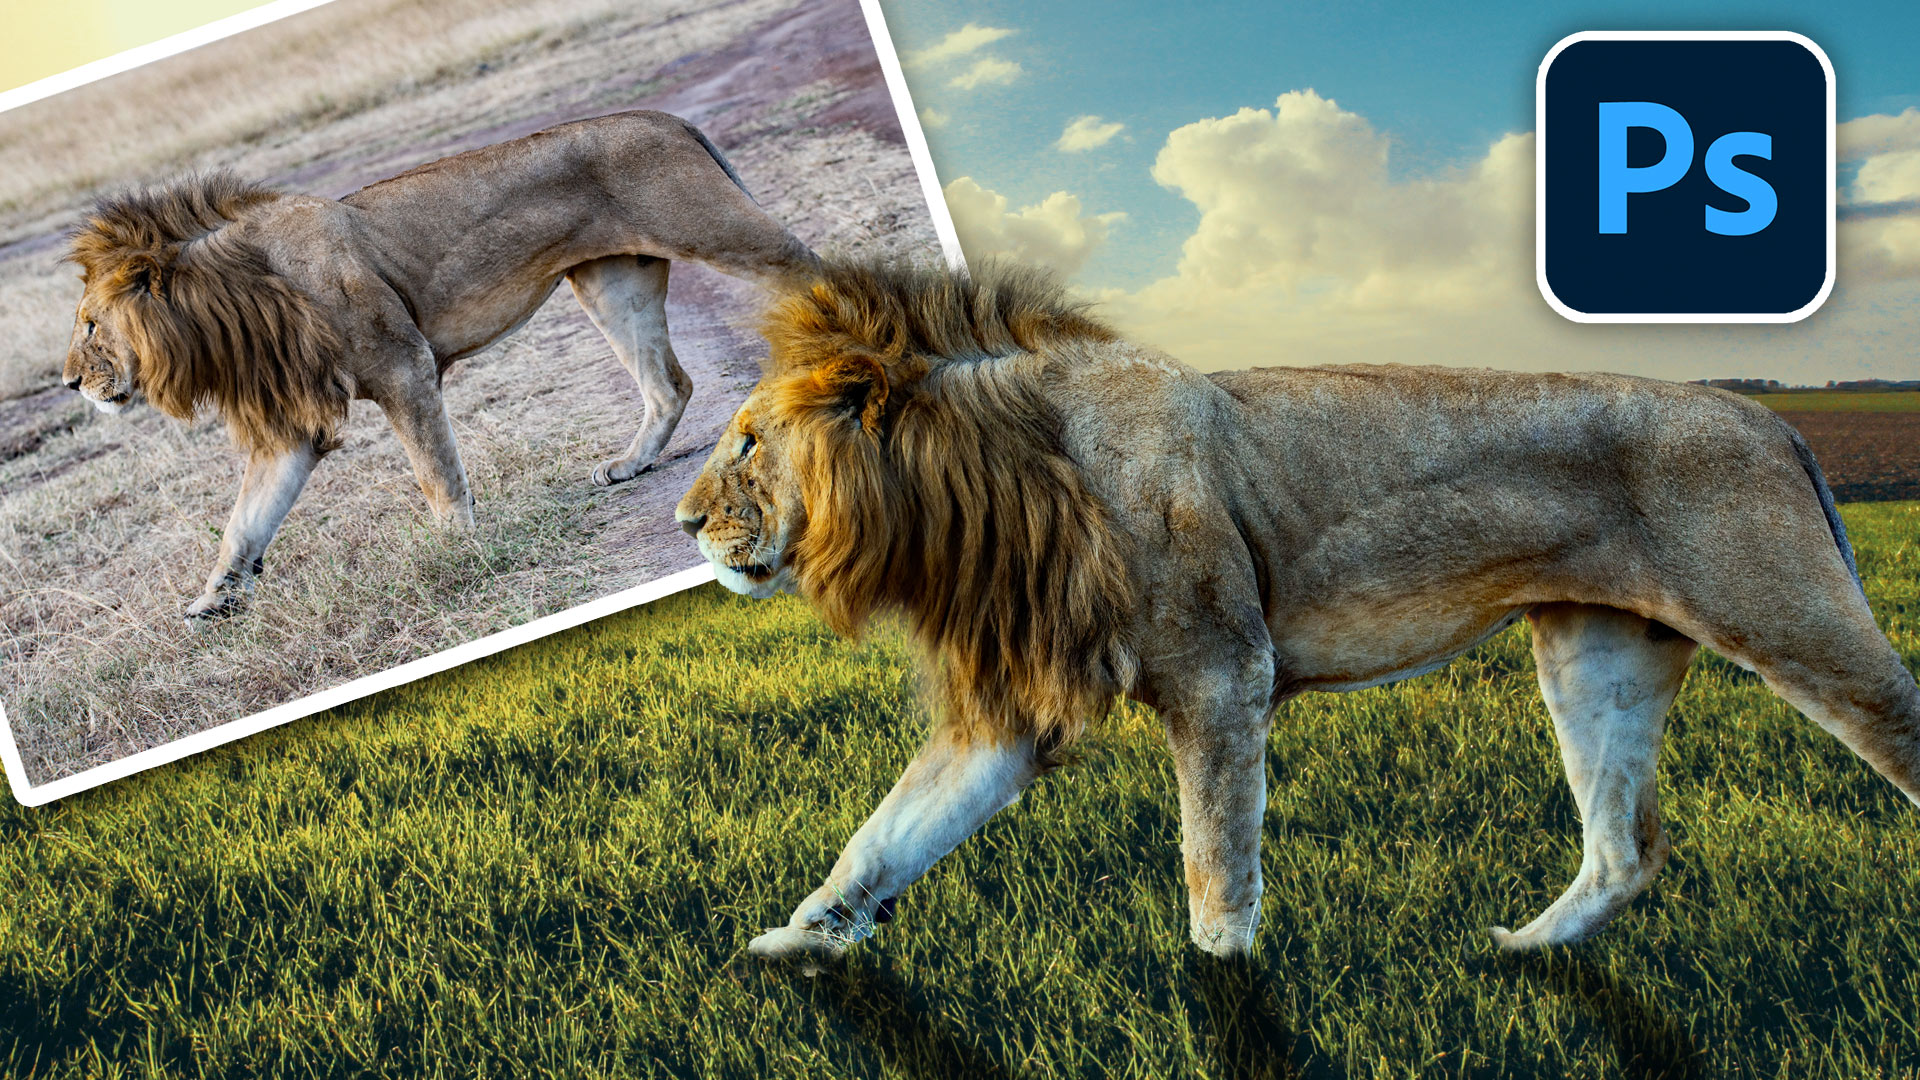
This photoshop tutorial shows you how to combine images so they look like a single image. I have made the steps niuce and simple so you can follow along and apply these steps your own images.
Step 1. How to Combine images in Photoshop
Open the 2 images File>Open

To combine the 2 images (Watch the video to learn about resolution and which picture to use as the base, I skipped over this in the steps to make it easier)
Choose the move tool
Click in the center of the lion image
With the mouse still pressed, drag the pointer up to the tab of the image you want to move the lion into.

The second image will open. With the mouse still down, drag into the center of the new image.

Hold the Shift key (to center) and then release the mouse.
You will now have a single document with 2 images as layers. (See the layers panel)

Here the 2 images are on layers, we need to blend them together now.

Step 2: How to remove the background from a layer
The first thing we need to do is remove the background from the lion picture, so the new background can show through.
Let’s shrink the image of the lion a little bit.
Choose Ctrl/Cmd+T for free transform.
Drag the handles to make the lion smaller.

If the image distorts, hold down the Shift Key to constrain the proportions. If it doesn’t distort, you don’t need to hold downShift. (Its now a toggle and could be working either way).
Here is the result.

To cut out the subject…
Choose the Quick Selection Tool
Click select Subject from the top bar
You will see a selection around the lion

Choose Select and Mask

This will take you into select and mask where you can refine the edges of the selection.

Choose the refine brush (usually its selected by default)

Drag the brush over the edges of the fur

When you release the brush, it will improve the selection around the edges of fur and hair

Turn on Decontaminate Colors, Choose New Layer with Layer Mask and Click ok.

The lion is now cut out. It’s the same process for a person or anything really.
Press Ctrl/Cmd+T for Free Transform once again.
Size and position your lion.
Press Enter to apply

Step 3: How to match the colors and lighting
The lion is in position, but the color and tone don’t match the background yet.

With the lion layer selected, choose Image>Adjustments>Match Color
Under source, choose the image you are working on

In Layer, choose the layer you want to copy the colors from. This will be the background
You will see the adjustment applied to the lion
Use the fade to reduce the intensity of the adjustment

This is looking good.
Click OK

Step 4: How to create realistic shadows in Photoshop
Now the lion matches the background, but we need a shadow to anchor it into the scene. This is the step that adds a lot of the realism.
Choose the Lion layer and click the fx at the bottom of the layers panel
Choose Drop Shadow

Apply a black drop shadow. Don’t worry about the angle and everything at this point, we are just looking for a black silhouette
Click OK

We want to make the shadow a regular pixel layer
Right Click on the drop shadow and choose Create Layer

The shadow is now a normal layer.
Choose the shadow layer and press Cmd/Ctrl+T
Right-Click and choose Flip Vertical

The shadow layer will now be flipped.
Drag the shadow underneath the lion

Right-Click and choose skew
Drag the bottom of the shadow to change the angle to match the light direction

Reposition and press Enter to apply.

The shadow is in position. We need to soften it
Choose Filter>Blur>Gaussian Blur.
14.8 makes this shadow nice and soft.
Press ok.

Adjust the opacity of the shadow so it isn’t so dark.

And there is the shadow.
I have a more accurate way of making shadows (based on this method), My next tutorial will be on just making a shadow, I want to keep this tutorial as simple as possible since it’s a whole walk through of the entire image..

Step 5, adding a Color Grade.
Nothing brings a room together more than a rug.
Nothing brings different layers together more than an overall color grade. It also adds flavor.
Here is a fast way.
Choose the top Layer
Create a new Color Adjustment layer

Choose your color.

Change the blending mode (normal) to Color
Reduce the opacity to suit your taste.

Because its an adjustment layer, you can click on the color and change it any time you like, each color will give the composite a different feel or mood.

I hope you enjoyed this tutorial. Don’t forget to watch the video at the top for clarity on these steps and extra tips.
Keep your eyes open for the next tutorial, which is creating super realistic shadows
Thanks
Colin
If you like this tutorial, check out my new course on Learning Layers in Photoshop
PS Don’t forget to follow us on Social Media for more tips.. (I’ve been posting some fun Instagram and Facebook Stories lately)
You can get my free Layer Blending modes ebook along with dozens of exclusive Photoshop Goodies here