
Maybe you’re new to PC gaming, and you missed out on Deus Ex when it rocked the gaming world 11 years ago. Or maybe you just finished playing Deus Ex: Human Revolution, and you want to revisit the first game in the series. Either way, if you’re hankering for some classic nano-augmented role-playing shooter action, nothing will scratch your itch quite like the original Deus Ex. Here’s how to make it look better than ever on a modern Windows 7 PC.
First, you need to buy a copy of Deus Ex if you don’t already have it. The game is available on Steam for about $10, though it often goes on sale during holidays if you’re looking to save a buck or two. If you still have your old CDs, you can just install from the disc and download the 1.112fm patch to update the game to the most recent version.
After you install Deus Ex, run it once. You don’t need to start a new game–just open the application, let it load to the menu screen, and exit. Later on you’ll need to edit a configuration file that Deus Ex creates when it first runs.
Next, grab Deus Exe, a modified version of the Deus Ex executable file by Kentie that fixes several bugs and adds a prelaunch configuration menu. When the download finishes, navigate to your Deus Ex install directory (if you bought it on Steam, it defaults to C:Program FilesSteamsteamappscommondeus ex), open the System directory, find the DeusEx.exe executable, and make a backup copy of it. Then, copy the contents of the DeusExe-v3.zip file into that directory, replacing any duplicate files with the modified ones.
That’s enough to get Deus Ex working with most of the bugs fixed. You want Deus Ex to look better than before, however, so we’re going to throw in a pair of third-party patches that bring this game a bit closer to modern graphics standards.
Download Kentie’s Direct3D 10 renderer for the Unreal Engine. Before you install this software, make sure that you have the latest DirectX update, plus the Visual C++ 2010 runtimes. Download and install both files; the DirectX update app will merely scan your system and download whatever is needed, and the Visual C++ 2010 runtime will simply install any files you don’t already have. If it asks you whether to repair or remove the Visual C++ 2010 runtime, that means you already have what you need, so just exit the installer.
After that, open d3d10drv-v27.zip, and copy the three files inside the DeusEx directory (d3d10drv.int, d3d10drv.dll, and a directory called d3d10drv) to your Deus Ex install’s System directory (C:Program FilesSteamsteamappscommondeus exSystem, for example). The next time you run Deus Ex, open the prelaunch configuration menu and choose Direct3D 10 Support as your renderer.
The last step is to install the Deus Ex: New Vision mod, which upgrades the in-game textures to significantly higher-resolution versions. You need to download the New Vision mod itself, plus the hotfix patch. Once you’ve finished downloading both files, unzip NewVisionV1.zip, copy the NVTextures directory into your Deus Ex install’s root directory (C:Program FilesSteamsteamappscommondeus ex), unzip NewVisionV1_hotfix.zip, and copy those contents into the NVTextures directory, replacing all the duplicate files with the new ones.
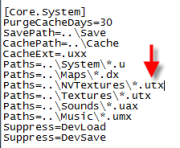
Finally, open your deusex.ini config file. Note that the modified Deus Ex executable you’re using keeps the file in C:UsersYour user accountDocuments/DeusExSystem, not in your Deus Ex install directory. (The deusex.ini config file in your Deus Ex install directory is meant to go with the stock executable, which you’re not using anymore.) Scroll down to the [Core.System] heading, find the line that says ‘Paths=..Textures*.utx’, and type Paths=..NVTextures*.utx above that line. Save the changes, and you’re ready to go.