

Help! My Lightroom catalog is a mess! What can I do?
This is a cry I hear often. People jump headfirst into Lightroom and don’t set it up correctly. This seems like the fast way to get going, but what you are really doing is building a web of confusion and mess. Fortunately, there is something you can do about it. Watch this tutorial which gives you some really valuable advice and tips to organize a messy Lightroom catalog.
You don’t have to delete everything and start over, you can salvage what you have. With some hard work, patience and little know how, we can get your photos all organized get you and on your way! To avoid this, set up Lightroom correctly in the beginning. Check out my very popular tutorial “Getting started in Lightroom in 15 minutes”.
(Click to subscribe to our youtube channel for more tutorials). 
How to Organize Your LIGHTROOM Photo Collection step by step
Have you ever got to a point where you feel like your Lightroom catalog is such a mess that you just want to declare Lightroom bankruptcy and just start all over again. I’m going to show you how to organize your Lightroom library without having to just ditch everything and start again. And this is actually coming from a request. This is what he said,
“I need to resolve my problems with Lightroom. My problem is I never set up Lightroom as recommended. My folders are all over the place and I find images in more than one folder, and bottom line, I need to reload Lightroom and essentially, start from scratch. How can I accomplish this and not lose my images?”
This is a common question I get. Here’s the good news. You’re not actually going to lose any of your images because none of your images aer stored in Lightroom. Your images are actually stored on your hard drive and they’re just managed in Lightroom.
We will work in the Library module right now, and if you’ll look at the catalogs, the first thing you want to do is click on All Photographs.

This displays every single photo in this Lightroom catalog.
Folders
Click on Folders. This is the actual directory structure. You can see mine is Macintosh HD, which is my main hard drive (you will also so other connected drives in the Folders panel).
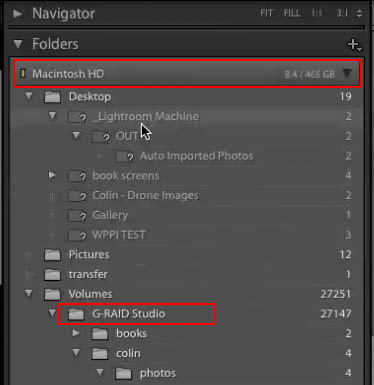
If you look in your Finder / File Explorer, you’re going to find them stored exactly the same as they are here. if you try to move these images around on your computer, through your system Finder, it’s going to mess it up because Lightroom is not going to know where those images are. If you are going to move images around, you want to make sure that you do it through Lightroom!
So, say for example, I’ve got my MacDrive here and I can see, 19 images on the desktop, and 12 on the pictures folder. Click on pictures, and you can see those are 12 there that are stored on my hard drive under the Pictures folder, under Mac HD.
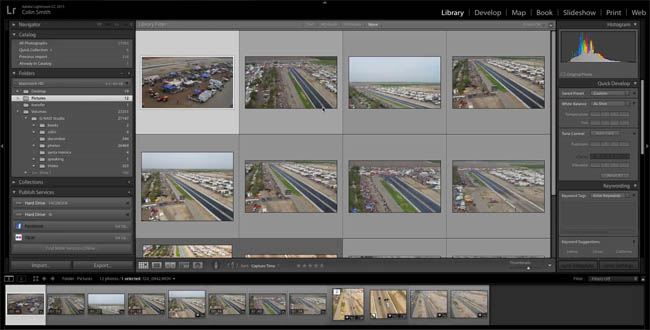
If I want to move them to a different location. Ctrl/Command + A to select them all, and drag that into another location ( Drag Racing).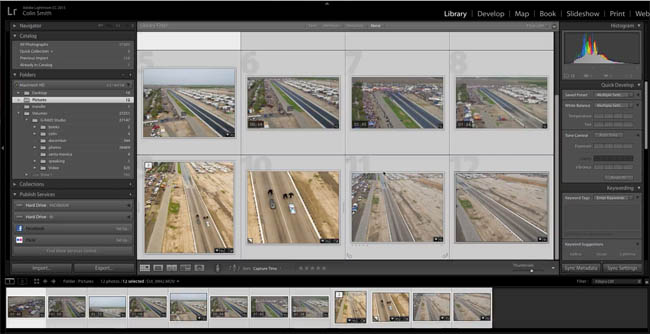
You’ll notice two things happening when they’re moving:
1. You will see a progress bar in notifications center at the top left
2. Notice that number is getting less in the original folder because it’s actually moving these, relocating them, and if we look down at the drag racing, notice that number is increasing.

So what’s happening right now is we’re moving the images from that hard drive that’s on my computer to my external hard drive. If you want to move your images around, this is the best way to do it.
When it’s done, Notice the pictures folder, there’s nothing there. I can delete this folder now if I want because there’s no pictures in there anymore. And if we go back to my external drive, notice these 12 images, have been relocated. Now what that is doing is it’s actually cleaning up what’s on your hard drive. It has organized them into proper folders.
Lightroom is still seeing these photos because you moved them within Lightroom. Once again, I’ll emphasize, do not try to move these outside of Lightroom. If you try to move these outside of Lightroom, they’ll not be erased but you’re not going to be able to find them. (You can relink them by clicking on the little question mark, but that’s tedious work).
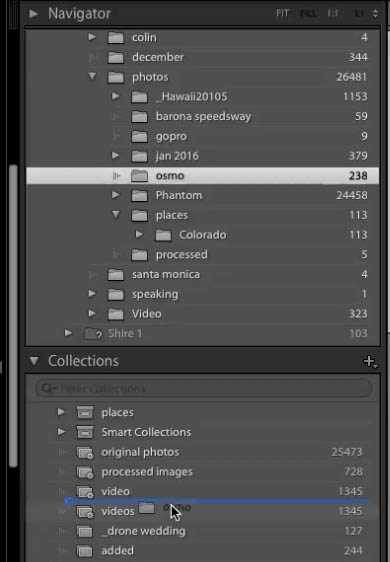
Collections
The next step you want to do is go into Collections. This is where you organize individual shoots.

Notice I’ve got everything organized under Shoots and Locations. You can set this up in a couple of ways. One, we can make a collection from a folder. Just drag the folder into the collections panel and it will create a collection with the same name and contain the same photos as the folder. All these collections do is reference the images.
Another way you could do it is to go under a collection, select and drag photos into other collections.
Use search filters
One of my strategies is to create a collection called Unsorted and I just dump everything into that unsorted collection. And then, you can use things like Filters, using text or attributes, metadata, camera type. For example , if I click the FC300, which is one of my Phantoms. Or f I hit FC350, there’s my Inspire 1. I can use this to go through the different cameras to organize those. You can go by focal length. You can go by different things to help you organize. You can use keywords, but the key here is to put them into collections.
Target Collections
Let’s create a new collection, by pressing the plus button in the Collections panel. Let’s just call this one “testing.” Right click and choose Set as Target Collection.
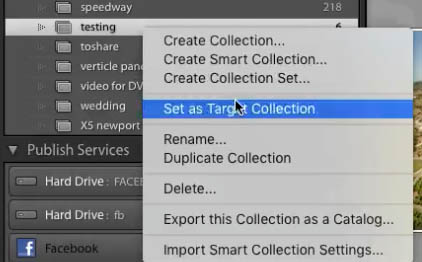
Okay, so that means that this is now the target collection, here’s how to add photos to it quickly: Go to a photograph and hover over the thumbnail in grid view, see that little circle up there?
Click on that little circle and that will add these into the target collection.
Open our testing collection and notice those ones that we’ve clicked on are now added to that collection.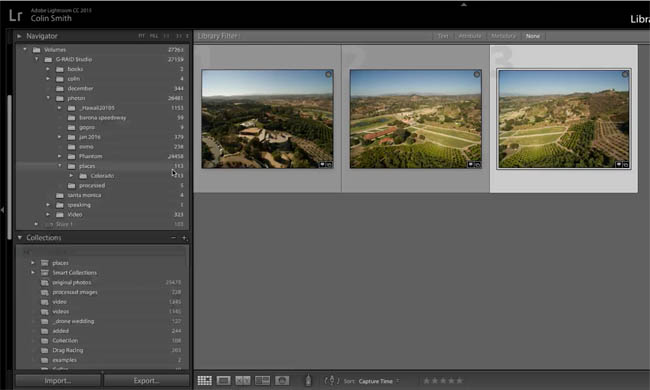
To reset target collections, right click on the collection name and turn off “set as target collection”, once you’ve done that, it just goes back to the very top, which is Quick Collection.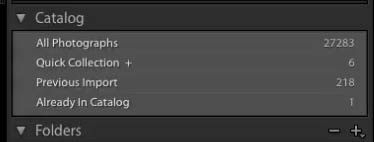
Now these collections don’t move the images, they don’t duplicate images. All we’re doing is we’re just organizing them where we could find them.
The collections help you find things.
The folders are where they actually live on your hard drive.
So, hopefully, this helps, and you don’t have to wipe out Lightroom and start all over again because it’s such a mess. You can actually go through and you can use different strategies, and organize this yourself.
I have a really comprehensive training, the Lightroom for Digital Photographers Series. Check that out. It’s a 13-hour video that has everything you need to know about Lightroom, and to help your organization, and also adjusting.
A little tip though. You have the option to add to a collection when you’re importing. That’s one of the things I would definitely recommend doing, and I do that now all the time. And the other thing, I’ll add some keywords, just some basic keywords while I’m importing, and that will help me avoid those big, massive amounts of work at the end.
When you are ready to master Lightroom, check out my comprehensive. 13 hour Lightroom for Digital Photographers premium training that will make you a master in no time! There is a lot in Lightroom that you’re not even aware of that can really help you.
Thanks for checking out this tutorial!
Great to see you here at the CAFE!
Colin
Get your free presets pack
You can download some free goodies, get the actions pack and the free ebook at https://photoshopcafe.com/freepresets
PS Don’t forget to follow us on Social Media for more tips.. (I’ve been posting some fun Instagram and Facebook Stories lately)
You can get my free Layer Blending modes ebook along with dozens of exclusive Photoshop Goodies here 


