
Removing a Picture from it’s Background Photoshop Tutorial
Cutting things out in Photoshop has to be one of the most requested tutorial topics. This tutorial is for older versions of Photoshop (CS4 and earlier), as the extract tool was replaced […]

Cutting things out in Photoshop has to be one of the most requested tutorial topics. This tutorial is for older versions of Photoshop (CS4 and earlier), as the extract tool was replaced […]
Step 1 You know the drill by now, make a new document and drag and drop both images into the document. Create a new layer for the back ground and fill […]
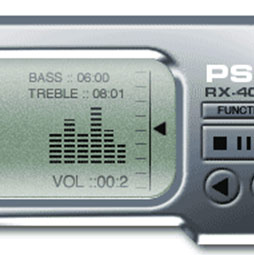
0 SHARES ShareTweetPinterestLinkedin GoogleWhatsappDiggRedditStumbleuponDeliciousTumblrFlipboard This is Part 4 of a 4 part tutorial 1 The basic shape 2 adding depth 3 LCD display 4 buttons Are you ready to wrap up this puppy? […]
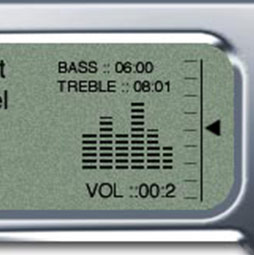
This is Part 3 of a 4 part tutorial We are now exactly at the half-way point in finishing our interface, once you finish this tutorial though we will be 3/4 of the […]

This is Part 2 of a 4 part tutorial 1 Begin with the shape you created last tutorial.Make a selection by Cmd/ctrl+clicking on the layer thumbnail 2 Now open the dreaded channels palette. […]
How to make a realistic looking 3D interface in Photoshop This is Part 1 of a 4 part tutorial 1 The basic shape 2 adding depth 3 LCD display 4 buttons Step […]
Step 1 Start with a blank document. Here I chose a black color for the bg. Create a new layer. Step 2 Edit>fill Choose pattern and and select the grid. If you […]
Step 1 Make a selection on a new layer with the rectangular marquee tool (M) Step 2 Press the “G” key to select the gradient tool. Select linear gradient […]
Step 1 1. Make a new canvas. Here, I used 800 x 800 pixels, 72 dpi, RGB, background white2. Invert your background to make it black2. Make a new layer3. Use your […]
Step 1 Create a new document.Mine was 300X200 pixels. You would probably want something larger. Modify all the settings for a larger image size. Experiment. Create a new layer With the Polygon lasso […]